 Are you ready to bind your quilt by machine? Quilt Binding is the final process of finishing the edges of your quilt so it can be used and enjoyed. I've created a three part quilting tutorial to guide you through every step of the process.
The steps to quilt binding by machine:
1. Preparing a Quilt for Binding by Machine
2. Create the Binding and Stitch it to the Quilt
3. Finishing the Binding by Machine
Yes, You Can Do Quilt Binding with Your Home Sewing Machine!
Unfortunately many quilters think quilt binding must be finished by hand. Yes, hand finished binding is the best choice for those extra special, heirloom quality quilts you want to last the test of time, or compete with in a quilt show. But for most quilts that are intended to be drug around the house and used on your beds, couch, and tablecloth, machine binding is perfectly fine and you can complete the entire process in one day.
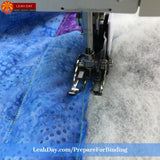
Make sure to start with preparing your quilt for binding. This is an essential step because it prepares the edges of your quilt so they're stable and easy to stitch the binding along the edge.

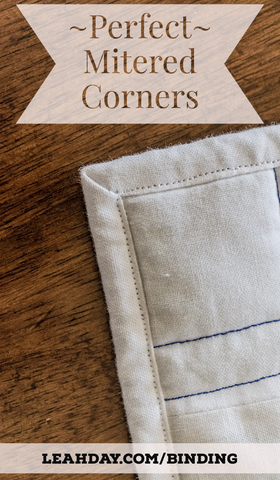
Preparing the edges of the quilt is especially important when you're working with a tricky material like Minky fabric on the back of the quilt as you can see in the photo above. Check out that beautiful mitered corner on the front and back! That's all thanks to stitching the Victory Lap and carefully squaring the quilt. Click Here to learn how to prepare your quilt for binding.
The next step of this process is to piece an extra long strip of quilt binding. In this tutorial I'm going to teach you how to make Straight Grain Binding. This is binding that's perfectly suited to stitch on the edges of normal quilts with straight sides and 90-degree corners.
This type of binding is also very easy to cut and piece, however, there are a lot of steps in this process and some of them, like starching your fabric, you may have never tried before.
Trust me - following each step and working with fabric that's stiff and stable and easy to work with will make the binding process much quicker. If you'd like it to be fun instead of a fight, make sure to follow all the steps I share in this quilting tutorial:
I use a Ceramic Marking Pencil to mark my binding so I don't stitch too far on the corners and to line up the loose ends perfectly. Click Here to find this marking pencil.
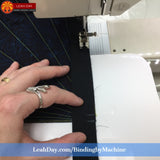
You might never have starched or squared fabric before. This is an essential step to preparing your quilt binding because it reduces the stretch and movement of the fabric and makes it much easier to cut long straight strips.
If you've been cutting strips that have a little "V" in the middle on the folds, this is a sign your fabric isn't properly square before cutting. Click Here to learn how to properly starch, square, and cut long strips.
Does this seem like a lot of work? It is a lot of steps to prepare your quilt binding. By taking the time to complete each step, it will make it so much easier to stitch the binding on by machine. If the fabric is moving and wiggling, it's going to fight you every step of the way and probably won't look very good in the end.
Now for a few handy dandy diagrams to guide you through the machine binding process. First stitch your binding pieces together with a diagonal seam like this with one binding strip right side up and a second binding strip right side down:

Why a diagonal seam? This reduces the bulk of the seam when you fold the binding strip in half. If you use a straight seam, you'll have a big chunk of 1/4 inch seam allowance landing only in one spot on the binding.
When you stitch a diagonal seam, it spreads the seam allowance out over the length of the seam so it doesn't look like your binding has a strange bulge only in one spot. We don't want a binding bulge!
Now that the binding is sewn together nicely, trim the seam allowances and press them open - that also reduces their bulk inside the binding - and press the entire strip in half.
 How Wide Do You Cut Quilt Binding?
 How Wide Do You Cut Quilt Binding?
Quilters like to argue about how wide to cut binding. I like 2 inch wide binding, but when I first started quilting I was taught to cut it 2 1/2 inches wide. This never resulted in a plump, cushy edge to the quilt. The binding flatted out and the edge was very pointy and sharply folded as it wrapped around the quilt.
I learned the hard way that quilt show judges like fat, plump, rounded edges because this will wear better over time. A sharply folded edge which will eventually cause the fabric to split in that one spot. Once I learned this, I shrank the cutting width of my binding down to 2 inches wide due to this simple math:
2 inch wide binding folded in half = 1 inch wide binding strip.
- 1/4 inch is taken away in stitching the binding on the quilt.
- 1/4 is taken away to fold over the back side of the seam allowance.
- 1/4 inch is taken away folding to the front side of the seam allowance.
- 1/4 inch of fabric covers the curve on the edge of the quilt and the fold which should rest just inside the stitching that holds the binding down on the opposite side of the quilt.
That's why I cut my quilt binding 2 inches wide. It works out perfectly every time and creates a plump, rounded edge for the quilt.
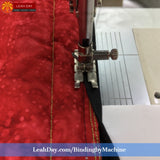
Stitching Binding to a Quilt By Machine
Once you have your binding cut and prepared as you saw in the video, it's time to stitch it to the edges of the quilt. First arrange it around the quilt so the seam lines don't line up with the corners.
No, it's not the end of the world and your quilt will not be ruined if a seam allowance happens to hit a corner dead on. It does make the process a bit more fiddly so take your time arranging the strip around your quilt so you can avoid the extra stress and blood pressure spikes.
Now is the time to decide how you want to finish the binding. Yes, this is a big choice and will decide if you finish this quilt project today or...some indeterminate time in the future. If you're in a hurry, go with option A.
A - If you want to stitch your binding entirely by machine, first arrange and stitch the binding to the quilt on the WRONG SIDE.
B - If you plan to hand stitch the binding down, arrange and stitch the binding to the quilt from the RIGHT SIDE.
 Folding the Binding to Create Mitered Corners
 Folding the Binding to Create Mitered Corners
The trickiest part of binding a quilt is turning and folding the binding strip to create nicely mitered corners. This is the little 45-degree angle fold in the corners of the quilt that looks super cute on the front and back and also allows you to stitch the entire long binding strip all the way around the quilt in one pass.
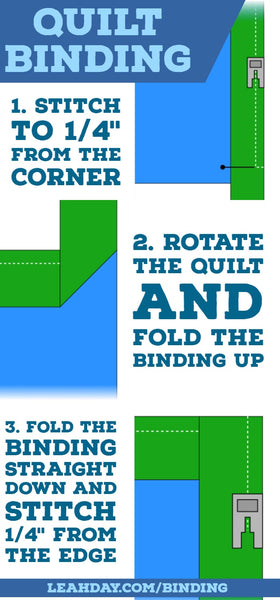
1. To make perfectly mitered corners, the first step is to stop stitching 1/4 inch before the corner. You can back stitch here, or I usually just change direction and stitch straight off the edge of the quilt onto a scrap of fabric.
2. Then it's time to fold. Rotate the quilt so the next edge you're going to stitch along is facing the machine and fold the binding strip straight up, away from you. This should create a nice 45-degree fold in the corner. Yep, that's your miter!
3. Then take that binding strip and fold it straight down towards your body. This should line up with the next side of the quilt you're going to stitch and create a straight fold, level with the edge of the quilt.
Once you have the corner folded, slip the quilt back into your machine and stitch straight down the edge. As long as you stop and fold 1/4 inch from the corners, this method will always work great.
Connect the Ends of Quilt Binding Perfectly
The last tricky part to binding a quilt is connecting the ends together. You should leave at least 10 inches of quilt edge open at the beginning and end of your binding so you have plenty of space to work with and plenty of binding fabric to connect together.
Yes, you can do this with far less space and binding strip, but you will probably end up crying in frustration at least once. Let's try quilt binding without tears, shall we? Make your life easier and leave lots of extra binding strip at the beginning and end to work with.
There are a lot of binding tools and fiddly gadgets for putting your binding edges together. I've never found one I liked because they all seem to complicate this process, and I think it's complicated enough as it is!
You can do this entirely by marking and carefully aligning the ends of the strips together. Start by smoothing down the end of the binding strip along the edge of the quilt, then smooth down the beginning of the binding strip on top. Mark a dot on the fold of both binding strips in the middle of where they stack up together.
Unfold the binding strip where you stopped stitching first and place it right side up on your table. Then unfold the binding strip where you began stitching and place it right side down on top. Line the two strips up perpendicular to one another (like a + sign) and stack the two marked dots so they are right on top of one another. It helps to fold your entire quilt in half to bring the binding strips closer together.
Pin the binding strips together, then take it to your machine and stitch another diagonal seam from the upper left corner down to the lower right, just like the diagram above for connecting your binding strips together originally. And yes, it's important to stitch this in the right direction! If you stitch this in the opposite direction, you will create a twist in your binding!
For this reason, after stitching, open up your quilt and smooth the binding along the edge and make sure it lies flat and smooth to the edge. If it's twisted or not lying smooth, rip out that seam and stitch it again.
If it lies perfectly flat and looks consistent with the rest of your binding, trim the seam allowance down to 1/4 and press it open, then press that open area back flat to your quilt. Return the quilt to your machine and stitch that last open space to the edge of your quilt.
Done! Your long binding strip is now secured to one side of your quilt all the way around.
Quicker and Easier Method - Let's Bind a Quilt with Packaged Bias Binding
The method and video above was done entirely by machine... but making the binding is time consuming. I began playing with packaged double fold bias binding and found I could speed the process up just a bit! See how this works in this video:
Check out the other binding tutorials I've created so you can complete that step and finish your quilt today!
|
|
Make Binding and Stitch to the Quilt |
|
If you enjoyed this tutorial and you're eager to learn more about the quilt-making process, please join me for a quilting workshop! In these online classes, I share every tip and trick and go slowly through each step of the process. You'll learn how to master quilting techniques, quilt beautiful designs, and make whole quilts step-by-step!
 If you're looking for a fun project to stitch your quilting skills up a notch, check out the Waterfall Bargello Workshop.
This is a really fun quilting class that covers lots of different quilting techniques: how to piece a small Bargello wall hanging, how to audition designs and make a quilting plan, how to machine quilt with a combination of walking foot quilting and free motion quilting.
This was a really fun class to teach because I got to explore so many different quilting techniques and make a beautiful quilt for my home.
My Waterfall Bargello hangs in my dining room and makes me smile every day. I even added a bonus video on adding glittery thread to the surface with bobbin thread work because I thought it would make the quilt stand out even better, and it was the perfect choice.
Click Here to learn more about the Waterfall Bargello Workshop.
Let's go quilt,
Leah Day


